Installing IPS Server
The IPS Service account must be already created and configured before you start the installer. See IPS Service Account for the setup instructions.
If you are deploying IPS/Planning Space on a cluster of IPS Server machines, every machine should be set up to run the same version of the IPS Server software.
Download the server software
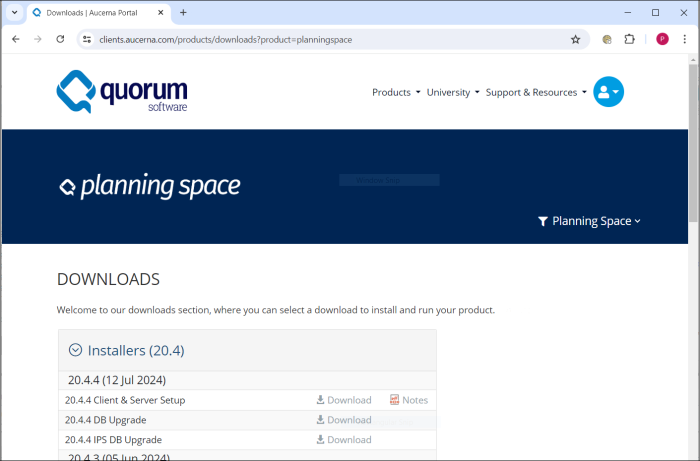
The installer executable ('.exe' file) can be downloaded from the Client Portal at https://clients.aucerna.com. (Access to this site requires a user account; to register for access, follow the instructions provided at the site.)
In the Products menu, select Planning Space > Downloads.

Version 20.4 installers are in the section 'Installers (20.4)'. Note that the files for each version are full installers and do not require other installers.
Download the unified installer 'Client & Server Setup' using its Download button.
You will also need to download the most recent 'DB Upgrade' and 'IPS DB Upgrade' files. Check the Release Notes for which database upgrades are required.
File install location defaults
The default location for the IPS Server program files is:
C:\Program Files\Palantir\PalantirIPS 20.4\
IPS Server configuration files and log files have the default location:
C:\ProgramData\Palantir\PalantirIPS 20.4\
You do not have to use the default locations, and these can be modified when using the installer program.
(Note: when you install a new version (e.g., 20.4 after 20.3) to an existing installation the plug-ins and other added content, including 'Logs' and 'Dump' files, will be left in the original folder by the installer. Plug-ins need to be manually transferred to the new installation folder, and must be checked for compatibility with the new version.)
Run the WiX unified installer
The executable contains the programs for server-side and client-side installation, and you select which installation that you want.
Note: ".NET Framework 4.8 Runtime" (minimum requirement) must be installed on all IPS Server machines, and on all client machines that run the Planning Space client software. The WiX installer program will check if this requirement is satisfied; if the check fails the installer will stop.
Double-click the exe file to run it.
Quorum Planning Space: License terms and conditions: You will need to tick the box to agree to the terms of the software license agreement. Click the Install button to continue.
Welcome to the Quorum Planning Space Setup Wizard: Click Next.
Installation Type:

Select Server. Click the Next button.
IPS System Accounts: Enter the name for the IPS Admin Group (this is the Windows group which will control administrator access to the IPS Server; by default it is a local security group 'Palantir IPS Admin', which will be created if it does not exist; the Windows user account running the installer is automatically added to the 'IPS Admin Group' so that the user will able to access the IPS Manager to perform post-installation setup). Enter the IPS Service Account credentials (Domain, User name, Password); this is the account which will be used to execute IPS processes on the server(s), but it is not an Administrator account and it is not given membership of the IPS Admin Group. Click Next. The installer will verify the Service Account login before continuing.
IPS Web Port: This is the port for HTTP where the IPS Server will be accessed. The default is port 80. Click Next.
IPS Configuration Location: The folder path for IPS configuration data. Use the default folder as provided, type in a new location, or use Browse. Then click Next.
Installation Location: The folder path for installation of programs. Use the default folder as provided, type in a new location, or use Browse. Then click Next.
Ready to install: If all is ready, you will see this message. Click the Install button to run the installation process.
The installer will report if the installation is successful, or if any errors have occurred. Log files are written to the folder specified by the system variable '%TEMP%' (usually 'C:\Users\{USERNAME}\AppData\Local\Temp') with filenames starting with 'Quorum Planning Space_{TIMESTAMP}'.
Browser shortcuts

The IPS Server interfaces for administration and tenant logins are accessed using a web browser. The installer program creates two browser shortcuts on the desktop:
- Planning Space 20.4: shortcut for 'http://{server FQDN}:{port}/', used for tenant logins and administration of each tenant.
- Planning Space 20.4 Admin: shortcut for 'http://{server FQDN}:{port}/admin/#', used for access to the IPS Manager (the administration interface).
Configure the server machine firewall
You need to configure the firewall of the IPS Server machine, which by default will be the built-in Windows Firewall, to create inbound rules for other machines to access the web port (default port 80).
Use the Windows Server administrator tool 'Windows Firewall with Advanced Security' to set a rule or rules. In the case of the IPS Server being a cluster of machines with a load balancer, you can restrict access only to the load balancer machine.
If no firewall rules are set then the IPS Server will only be accessible via a remote deskop (RDP) connection to the IPS Server machine.
Note: Additional ports need to be configured for access: see Firewall configurations.
